
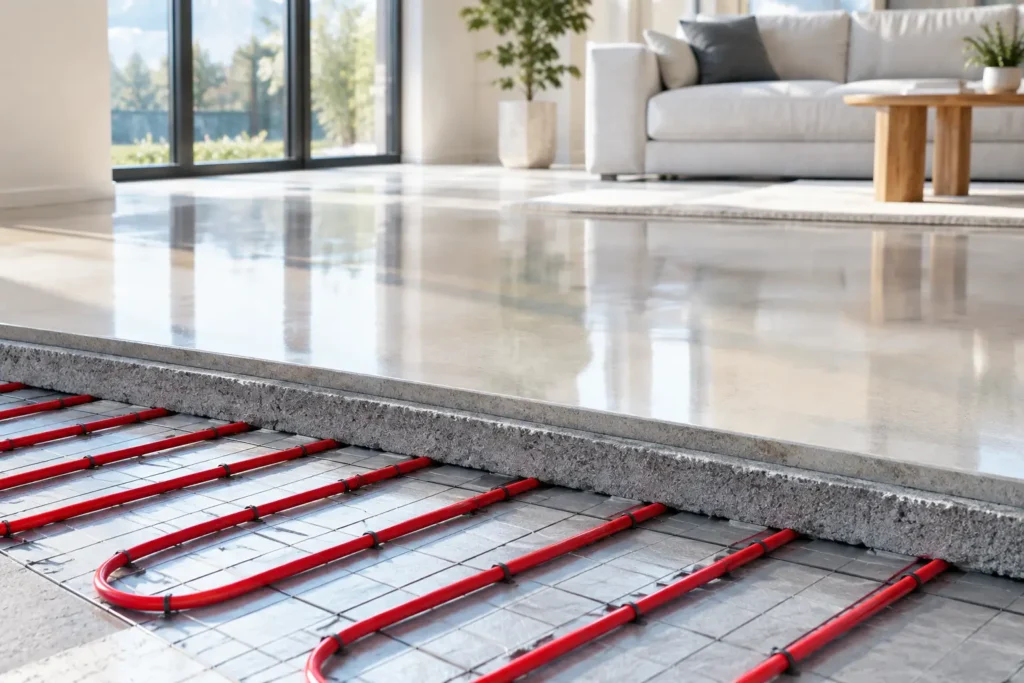
A beautifully poured resin floor should feel as good as it looks. This resin underfloor heating guide explains how to pair the two properly, so your kitchen, bathroom or open-plan living space gains that quiet, even warmth without compromising the refined, seamless finish that makes resin so distinctive.
Resin and underfloor heating can be an excellent combination. The finish is thin compared with many traditional floor coverings, allowing heat to travel efficiently into the room, while its joint-free appearance creates a calm, contemporary canvas for the rest of the interior. Success, however, is decided long before the final coat is poured. It rests on the floor build-up, moisture levels, heating controls and the choice of resin system.
Why resin works well with underfloor heating
Unlike carpet or thick timber boards, a resin finish does not create a substantial insulating layer over the heating system. When applied over a correctly prepared screed, it can help warmth rise evenly through the finished surface. The result is not simply a warmer floor underfoot, but a room that feels considered from the ground up.
The visual benefits are equally compelling. Underfloor heating removes the need for visible radiators in many spaces, leaving uninterrupted walls for cabinetry, artwork and architectural detail. Combined with a poured resin floor, this creates a particularly clean effect in contemporary kitchens, bathrooms, extensions and retail interiors.
That does not mean every resin product and every heating installation are automatically compatible. Resin is a specialist finish, and it needs a stable, dry substrate with temperatures kept within the system specification. A professional installation considers the complete construction rather than treating heating and flooring as separate decisions.
Resin underfloor heating guide: choosing the right system
Both wet and electric underfloor heating can sit beneath resin. The right choice depends on the project, available floor depth, room size and how the space will be used.
A wet system circulates warm water through pipes within a screed. It is often chosen for new builds, major renovations and larger areas because it can be integrated into the wider heating design. Once the screed has cured and been commissioned correctly, it offers a stable base for a suitable resin finish.
Electric systems use heating cables or mats and are frequently practical in smaller renovation areas, particularly bathrooms, en suites and compact kitchens. They can be easier to introduce where raising the floor level must be kept to a minimum. Their running costs and control strategy should be considered carefully, especially where they will heat a larger room every day.
The heating supplier, builder and resin installer should agree the specification before work begins. This avoids familiar problems: a screed that is not sufficiently dry, heating elements set too close to the surface, or a proposed floor build-up that leaves inadequate room for preparation and finishing coats.
The substrate matters more than the colour
Resin is only as reliable as the surface beneath it. Underfloor heating places a substrate through repeated warming and cooling cycles, so preparation is not an area for shortcuts.
For most projects, the heating system is covered by a suitable screed. That screed must be fully cured, sound and tested for moisture before resin installation begins. Drying times vary significantly with screed type, thickness, ventilation and site conditions. A screed may look dry while still retaining moisture that can interfere with adhesion or lead to flaws beneath the finished surface.
The heating should also be commissioned before the resin is installed. This process gradually brings the system up to temperature and back down again, helping to release construction moisture and demonstrate that the system operates as intended. The precise schedule should follow the screed and heating manufacturers’ instructions.
Once the substrate has been assessed, it is mechanically prepared and primed to create a dependable bond. Local repairs, movement cracks and joints require careful treatment. Resin creates an elegant continuous appearance, but it cannot make structural movement disappear. In some cases, movement joints need to be retained and detailed within the final floor rather than concealed.
Temperature control protects the finish
After installation, a resin floor needs to cure in stable conditions. The underfloor heating should remain off during this period unless the resin system manufacturer has given specific written guidance otherwise. Switching it on too early can disturb curing and affect the final result.
When it is time to use the heating, raise the temperature gradually. Sudden changes are unkind to any layered floor construction, from the screed upward. A controlled thermostat with a floor sensor gives greater confidence than relying on air temperature alone, particularly in bathrooms and rooms with strong sunlight.
Many underfloor heating systems are designed around a maximum floor surface temperature of around 27°C, but the correct limit for a resin floor must always follow the selected system’s technical data. This is not a detail to guess. Different resin formulations, floor constructions and room conditions can have different requirements.
Steady, moderate warmth is usually preferable to dramatic daily temperature swings. It supports comfort, helps the room hold a consistent temperature and is kinder to the floor over the long term.
Designing the finish around the room
Underfloor heating creates comfort. Resin provides the visual character. The best schemes treat both as part of a single design decision.
A soft concrete-effect resin can give a kitchen extension an architectural, gallery-like quality, while a terrazzo-inspired overlay brings movement and depth without introducing grout lines. In a bathroom, a carefully specified resin surface can continue across the floor and selected walls for a composed, spa-like feel. Metallic finishes can be striking in feature spaces, but the scale of the room, natural light and intended use all deserve consideration before committing to a dramatic effect.
Colour also changes how warmth is perceived. Pale mineral tones can make a compact room feel expansive and light, while deeper shades add grounding sophistication to larger, open spaces. Samples should be viewed in the actual room where possible, at different times of day and alongside cabinetry, paint and joinery. Resin is hand-finished, so its subtle variation is part of its artistry rather than a printed repeat.
For commercial settings, the priority may be different. A retail space may need a design-led finish that supports the brand experience, while a garage, kitchen or warehouse requires a system selected first for its resistance to traffic, cleaning regimes and operational demands. Underfloor heating can still be viable, but the resin specification must suit the environment rather than simply the desired appearance.
Common mistakes to avoid
The most expensive issues tend to start with rushed sequencing rather than the resin itself. Avoid these four common errors:
- Installing resin over a screed that has not been moisture tested and approved.
- Turning the heating on at full temperature shortly after the floor has been finished.
- Assuming a decorative resin system is suitable for heavy commercial use without a project-specific specification.
- Choosing a finish from a small image rather than reviewing samples in the planned lighting.
There is also a practical point about insulation. Underfloor heating is most efficient when the floor construction directs warmth upwards, not down into the subfloor. On a major refurbishment or new-build project, getting the insulation and heating design right may have more influence on comfort and energy use than the final floor covering itself.
Caring for a heated resin floor
A resin floor is straightforward to live with when it is cleaned thoughtfully. Sweep or vacuum away grit regularly, then use a pH-neutral cleaner and a soft mop for routine cleaning. Avoid highly abrasive pads, harsh solvents and cleaning products that leave a heavy residue.
Use protective pads beneath furniture and take care when moving heavy items. In entrance areas, a quality mat helps reduce grit brought in from outside. These small habits preserve the clarity of the finish, whether the floor is a quiet neutral or a more expressive decorative surface.
If the heating controls need adjustment, make changes gradually. The floor is designed for everyday use, not sudden thermal shocks. A well-planned system should fade into the background: no cold tiles in the morning, no radiators interrupting the walls, and no compromise in the visual flow of the room.
For projects across Essex and London, Resinize can help shape the conversation early, when the heating layout, screed and finish can still be coordinated properly. The most enduring resin floors are not chosen as a final surface alone – they are crafted as part of the architecture of the space.